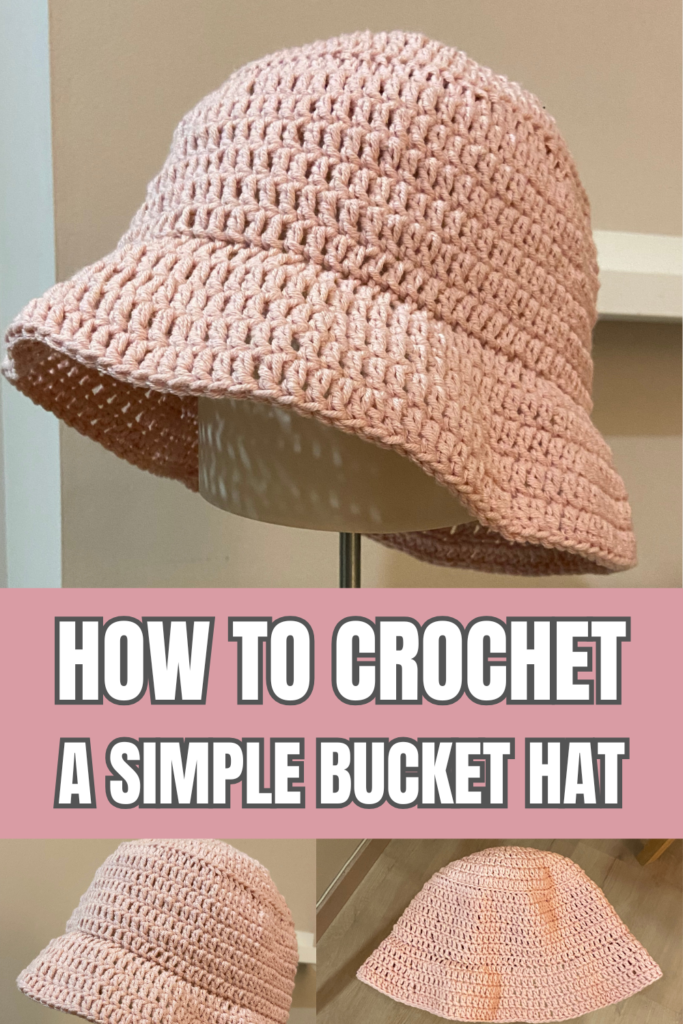
Upgrade your handmade wardrobe with this free crochet bucket hat pattern! Featuring a trendy structured crown, clean stitch definition, and a flared sun-shading brim, this stylish accessory is one of the most popular and practical projects you can craft. Whether you are prepping stock for summer pop-ups, packing for a beach vacation, or making a chic gift for a friend, this step-by-step tutorial will guide you through crafting a perfectly fitting hat.
Bucket hats have taken fashion and the handmade community by storm. Crafters love them because they build quickly using continuous rounds without requiring complex shaping or joining seams. Working with breathable cotton yarn creates a crisp, sun-ready summer hat, while plush or velvet yarns yield a cozy, retro winter accessory. In this comprehensive guide, you will find a full breakdown of materials, sizing and measurement advice, tips to keep the brim structured, and clear row-by-row instructions.

Why You Should Crochet a Bucket Hat Today
Trendy wearables are constant bestsellers online and at physical markets. Here is why adding this bucket hat to your project queue is a brilliant idea:
- Great Skill Builder for Wearables: Crafting a bucket hat is a fantastic way to master flat-top crown increases, vertical sides, and outward brim flare shaping.
- Year-Round Bestseller: Depending on your yarn choice, bucket hats sell exceptionally well at spring/summer craft fairs as sun hats and at autumn/winter pop-ups as cozy accessories.
- Fast Wearable Project: Unlike sweaters or large blankets that require weeks of work, a complete bucket hat can easily be crocheted in a single afternoon (about 2 to 3 hours).
- Highly Customizable Style: You can easily add colorful stripes, checkerboard patterns, embroidered flowers, or contrasting brim edges to express your personal style.
Design, Sizing and Brim Structure Tips
Getting a bucket hat to fit comfortably without slipping or feeling too tight comes down to measuring the crown diameter before working the sides.
How to Measure for a Custom Fit
The flat circular top (the crown) determines the overall size of the hat. To fit an average adult head (54–58 cm circumference), continue your flat circle increases until the crown measures approximately 16–17 cm (6.5 inches) in diameter. Once you reach this width, stop increasing and work straight rounds to build the depth of the hat down to eyebrow level.
Keeping the Brim Firm and Flared
A common issue with crochet bucket hats is a floppy brim that sags into the eyes. To ensure your brim holds its iconic angled flare, maintain a firm working tension during the brim increase rounds. Using a durable cotton yarn or downsizing your hook by half a millimeter for the brim rounds adds stiffness and structural support.
Yarn Substitutions and Style Variations
The choice of yarn dramatically influences the drape, weight, and season for your bucket hat:
- Worsted Weight Cotton Yarn: Cotton yarn (like Katia Alabama or 100% aran cotton) is the ultimate choice for summer. It provides excellent breathability, structure, and stitch clarity while shading you from the sun.
- Raffia or Straw Yarn: For an authentic, natural beach hat aesthetic, swap cotton for paper raffia yarn. Raffia creates a lightweight, stiff brim that holds its shape effortlessly.
- Velvet or Chunky Chenille Yarn: Swapping to bulky plush yarn with a 5.0 mm or 6.0 mm hook yields a soft, velvety winter bucket hat that keeps you warm in style.
Why You’ll Love This Crochet Bucket Hat
- Beginner-Friendly: Uses simple double crochet (dc) stitches.
- Versatile: It’s a classic, structured bucket hat that fits every wardrobe.
- Customizable: Written in three sizes (S, M, L) and easy to adjust for a perfect fit.
- Quick Project: Made with Aran-weight yarn and a 5 mm hook, you can whip this up in a weekend.
Materials You Need
- Yarn: 2 skeins of Aran-weight yarn (I recommend Katia Alabama or similar cotton/acrylic blends).
- Hook: 5 mm (H-8) crochet hook.
- Stitch markers.
- Scissors.
- Tapestry needle.
- Tools: Measuring tape.
Abbreviations (US Terminology)
- MR: magic ring.
- St(s): stitch/es.
- Ch: chain.
- Dc: double crochet.
- Inc: increase (2 dc in same st)
- Sl st: slip stitch.
- FO: fasten off.
- FLO: front loops only.
- BLO: back loops only.
Important Notes
- All increases are worked as inc-dc (two double crochet stitches in the same stitch).
- The turning chain at the beginning of a round does not count as a stitch.
- This pattern includes three adult sizes: S, M, and L. Stitch counts for each size are given in parentheses throughout the pattern in the format (S, M, L). Make sure to follow the numbers corresponding to your chosen size.
- Sizing & Fit:
- This hat is worked from the top down, which makes it super easy to customize. You can try it on directly on your head as you crochet, allowing you to check the fit and adjust your progress on the go for a perfect fit!
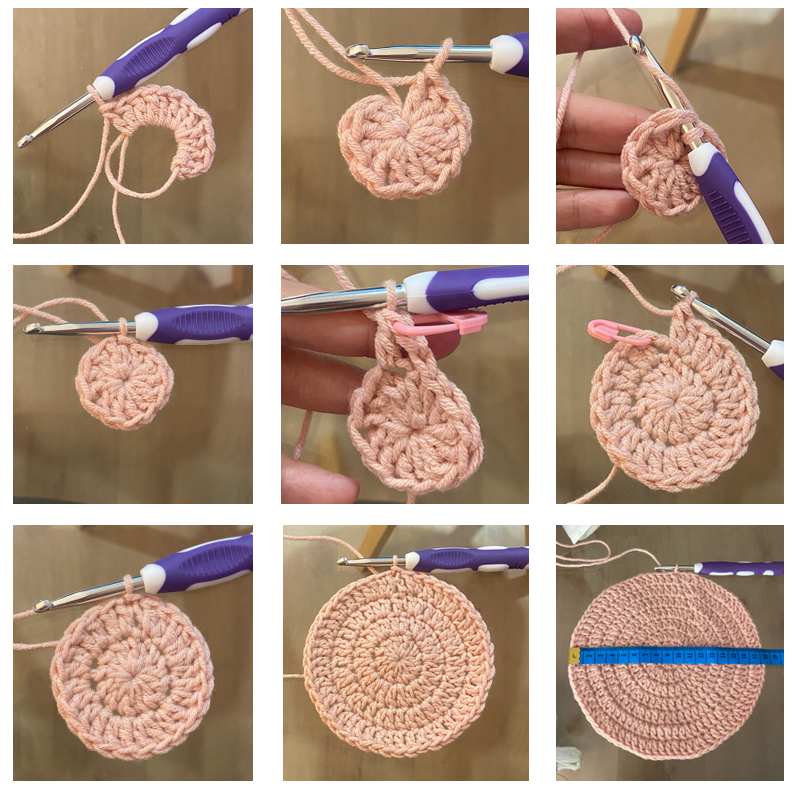
- To make sure your crown reaches the exact right size, use your measuring tape! To find the ideal flat crown diameter for your head, measure your head circumference around your forehead and divide it by number pi (approx ⟶ 3.14). Once your circular crown matches that diameter across, you are ready to move on to the body of the hat!
Not ready to start right now?
Join the community & get a free pattern!
Free Simple Bucket Hat Crochet Pattern
Top of the Hat (Crown)
Round 1: In a MR, ch2 (does not count as st), 12 dc. Join with sl st to first dc. (12)
Round 2: Ch2, inc in each st around. Sl st to join. (24)
Round 3: Ch2, (1 dc, inc) repeat around. Sl st to join. (36)
Round 4: Ch2, (2 dc, inc) repeat around. Sl st to join. (48)
Round 5: Ch2, (3 dc, inc) repeat around. Sl st to join. (60)
Round 6: Ch2, (4 dc, inc) repeat around. Sl st to join. (72)
Round 7: Ch2, (5 dc, inc) repeat around. Sl st to join. (84) [Stop here for Small and move on to the Body of the Hat]
Round 8 (Medium size only): Ch2, (6 dc, inc) repeat around. Sl st to join. (96) [Stop here for Medium size]
Round 9: (Large size only): Ch2, (7 dc, inc) repeat around. Sl st to join. (108) [Stop here for Large size]
Note:
To make a wider/larger crown, simply continue working increase rounds following the established sequence (e.g., [8 dc, inc] for Round 10).
To make a smaller crown, stop after fewer increase rounds.
The Body (Sides)
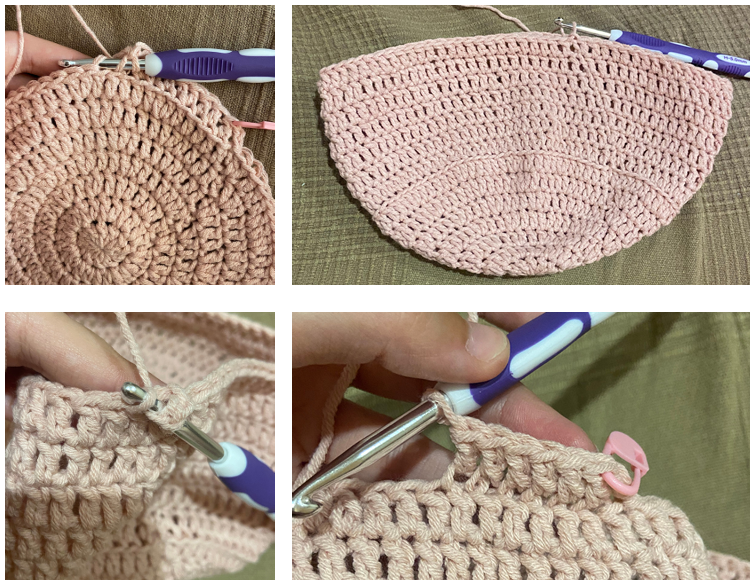
Round 1: Ch 2, working in BLO, dc in each st around. Join. (84, 96, 108)
Rounds 2-7: Ch 2, dc in each st around. Join. (84, 96, 108)
The Brim
Round 1 (Brim Start): Ch2, working in FLO:
- Size S: [(6 dc, inc) repeat around]. (96)
- Size M: [(7 dc, inc) repeat around]. (108)
- Size L: [(8 dc, inc) repeat around]. (120)
Round 2: Ch2, dc in each st around. Join. (96, 108, 120)
Round 3: Ch2:
- Size S: [(7 dc, inc)] repeat around. Join. (108)
- Size M: [(8 dc, inc)] repeat around. Join. (120)
- Size L: [(9 dc, inc)] repeat around. Join. (132)
Round 4: Ch2, dc in each st around. Join. (108, 120, 132)
Round 5: Ch2:
- Size S: [(8 dc, inc) repeat around]. Join. (120)
- Size M: [(9 dc, inc) repeat around]. Join. (132)
- Size L: [(10 dc, inc) repeat around]. (144)
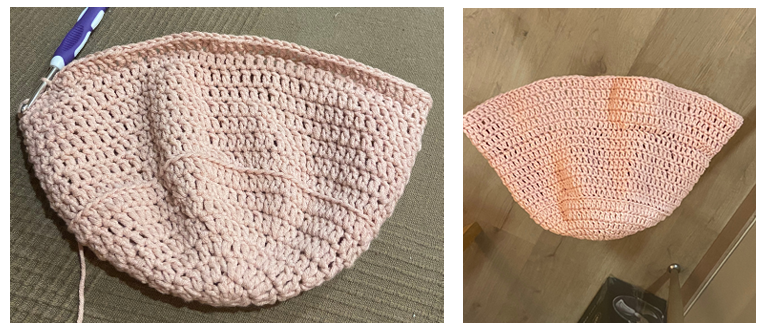
FO, weave in your ends.
Finishing Touches and Care Instructions
Once you complete the final round of the brim, weave in all yarn tails securely along the interior stitches using a tapestry needle. If your brim needs extra shaping after crocheting, steam-block it gently with an iron held a few inches away (do not touch the iron directly to synthetic yarns) and smooth the brim flat with your hands.
Care Note: To maintain the shape and tension of your handmade bucket hat, hand wash gentle in cool water and reshape it over a small bowl or towel sphere while laying flat to dry.
And that’s it!
I hope you enjoyed crocheting this free bucket hat crochet pattern just as much as I loved designing it. If you decide to make one, I would love to see how it turns out—don’t forget to tag me on Instagram (@crochetbysilvia) so I can admire your cute amigurumi!
Your support means the world and helps me keep creating and sharing more free patterns with you!
Don’t doubt to check our other free crochet patterns.
—Happy crocheting!
This pattern is for personal use only. You may not copy, reproduce, alter, publish, or distribute this pattern in any format (including video tutorials). If you wish to share this pattern, please share a link to it rather than reprinting it on your site or blog.
You are welcome to sell finished items made from this pattern in small quantities, but do NOT use my photos as your listing or promotional photos. Please credit Crochet by Silvia as the designer.
Want to make viral crochet amigurumi friends? Check out my free turtle crochet pattern or my free jellyfish crochet pattern!
Frequently Asked Questions About This Pattern
Yes! This pattern uses fundamental crochet stitches, including the magic ring, single crochet, half-double crochet, and basic increases. It is a fantastic first wearable project for beginners.
Most crocheters can complete a full bucket hat in about 2 to 3 hours, making it a very quick and gratifying craft.
Absolutely! You are welcome to sell physical hats crafted using this free pattern at craft fairs, pop-ups, or online shops. Do not use the original photos as your listing pictures.