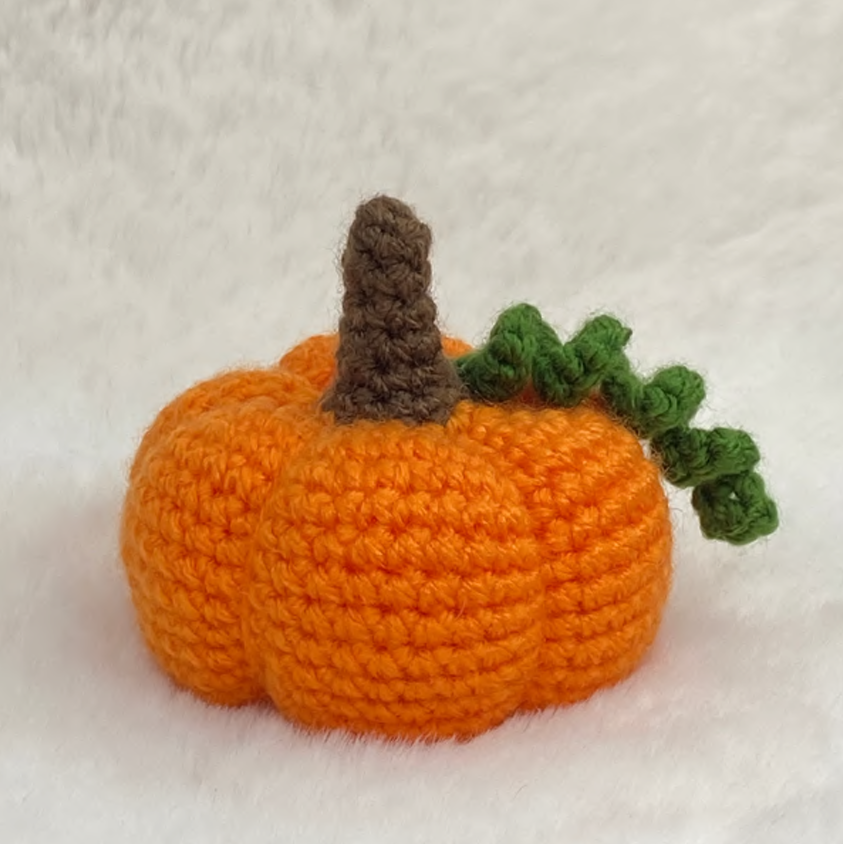
Bring warm, cozy autumn vibes into your home with this free little pumpkin crochet pattern! Featuring ribbed sections, a cute stitched stem, and an adorable squishy shape, this simple fall amigurumi is one of the most delightful and fast crafts you can make. Whether you are decorating your dining table for Thanksgiving, creating festive Halloween displays, stocking up your booth for autumn craft fairs, or making cozy gifts for friends, this step-by-step tutorial is a joy to complete.
Crochet pumpkins have become an essential staple of autumn home decor. Crafters love them because they offer timeless seasonal charm without requiring complex stitches or tedious assembly. Working with velvet chenille yarn gives the pumpkin a luxurious, velvety texture, while classic cotton yarn creates crisp, defined ridges. In this comprehensive guide, you will find a full breakdown of materials, yarn substitution ideas, tips for stitching deep pumpkin ribs, and clear row-by-row instructions to craft your very own mini pumpkin patch.
Want a printable PDF ad-free version? Get it here!Why You Should Crochet a Little Pumpkin Today
Fall-themed handmade decor is universally loved and stays in high demand throughout the entire autumn season. Here is why adding this mini pumpkin to your project Queue is a fantastic idea:
- Autumn Market Bestseller: Little pumpkins sell exceptionally well at September, October, and November pop-up markets, farm stands, and craft fairs.
- Versatile Home Decor: Place a cluster of different-sized pumpkins in a decorative bowl, arrange them on a fireplace mantle, or use them as cozy autumn table place settings.
- The Ultimate Scrap Buster: Requiring minimal amounts of orange, cream, green, and brown yarn, this pattern is perfect for utilizing leftover yarn ends from your stash.
- Simple & Relaxing Technique: Built using basic rounds or flat ribbed rows, this project allows you to practice shaping and ribbing without feeling overwhelmed by complex techniques.
Design and Technique Tips for Perfect Pumpkin Ribs
Transforming a simple sphere or ribbed tube into a realistic, segmented pumpkin relies on clever yarn shaping and balanced stuffing.
How to Define the Segmented Grooves
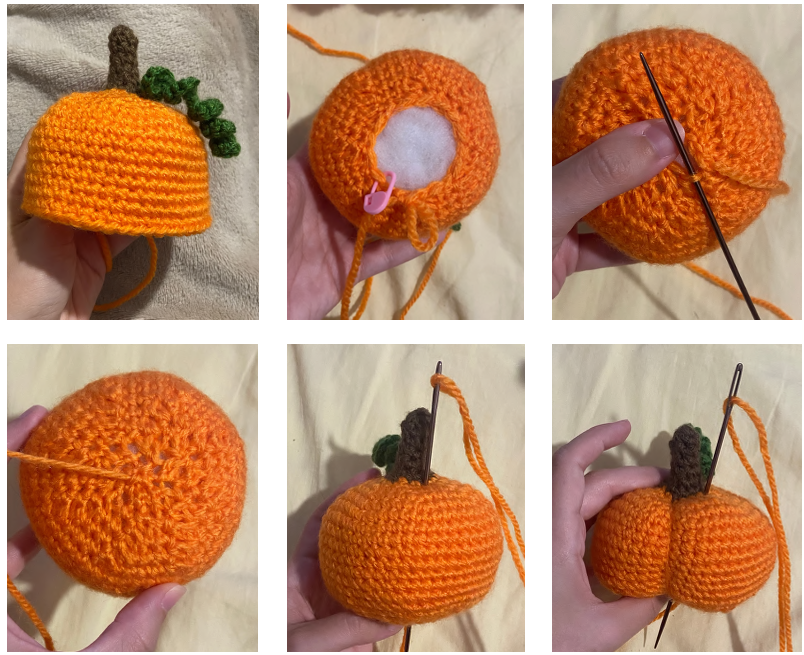
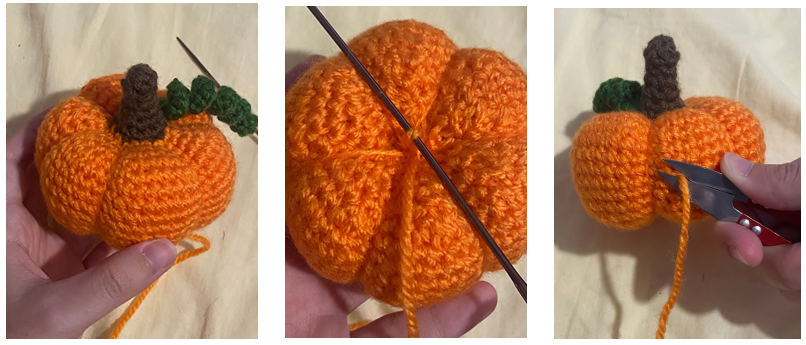
The secret to achieving iconic pumpkin ridges lies in the final shaping step. After closing the main body, use a tapestry needle threaded with a long tail of matching body yarn. Wrap the yarn vertically around the outside of the sphere, pulling it taut down through the center hole to create deep, evenly spaced indentations around the perimeter.
Stuffing Guidelines for a Squishy Base
When stuffing your pumpkin, avoid overstuffing to the point where the fabric is completely rigid. Keeping the fiberfill slightly soft and pliable allows you to press down on the center top and bottom, creating that classic flattened pumpkin silhouette when you pull the center yarn tight.
Yarn Substitutions and Seasonal Color Palette Ideas
One of the best aspects of crocheting mini pumpkins is how easily you can customize their style by swapping yarn weights and shades:
- Worsted Weight Cotton Yarn: Using cotton yarn with a 2.5 mm or 3.0 mm hook creates clean, defined ridges that work wonderfully for rustic garlands or dining table decor.
- Super Bulky Plush or Chenille Yarn: Swapping to chenille yarn with a 4.0 mm or 4.5 mm hook yields an ultra-soft, squishy plushie pumpkin that feels velvety to touch.
- Chic Autumn Colors: While bright burnt orange is classic, modern fall decor looks stunning with pastel sage green, mustard yellow, dusty rose, cream, or deep cinnamon pumpkins.
More Patterns
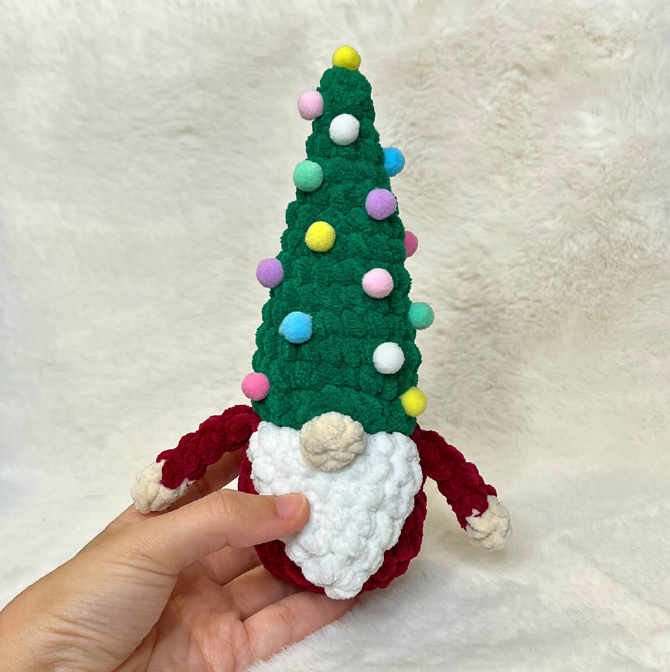
Materials You Need
- Worsted weight (category #4) 100% cotton yarn in:
- Orange (main color for the pumpkin).
- Brown (for the stem).
- Green (for the leaf).
- 4.5 mm crochet hook.
- Yarn needle (for sewing and shaping).
- Stitch marker (to mark the beginning of rounds).
- Fiberfill stuffing.
Abbreviations (US Terminology)
- MR: Magic ring.
- St(s): Stitch(es).
- Sc: Single crochet.
- Inc: Increase.
- Dec: Decrease.
- FO: Fasten off.
- Ch: Chain.
- CC: Colour change.
Finished Size
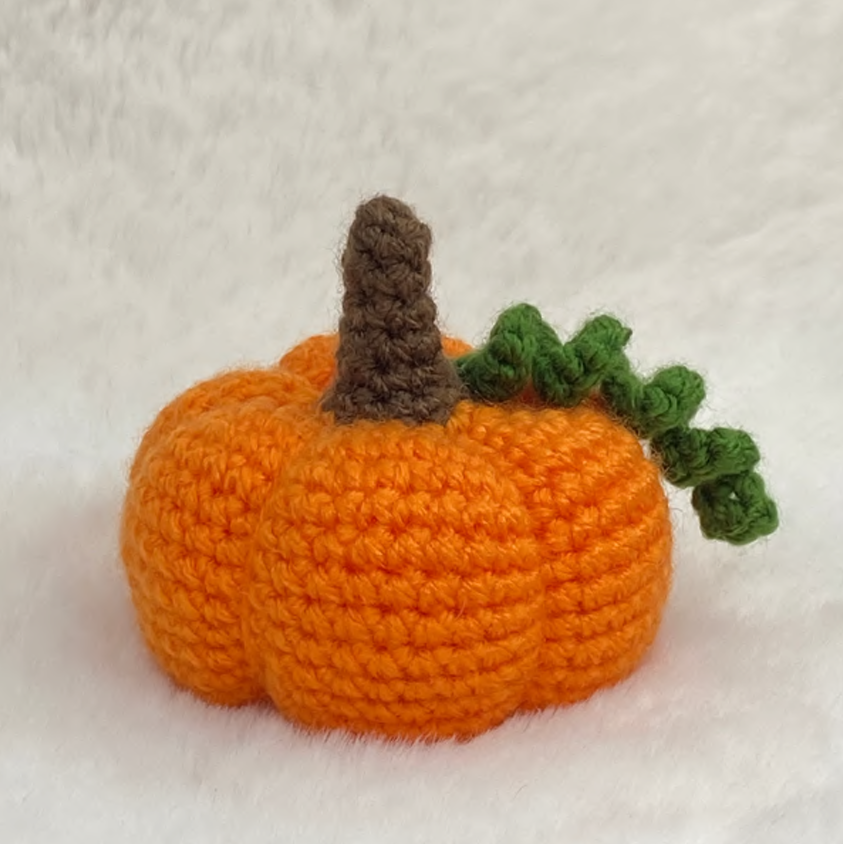
Your finished little pumpkin will measure approximately 9 cm (3.5 inches) in height, making it the perfect size for tiered tray decor or a cute seasonal plushie!
Join the community & get a free pattern!
Free Little Pumpkin Crochet Pattern
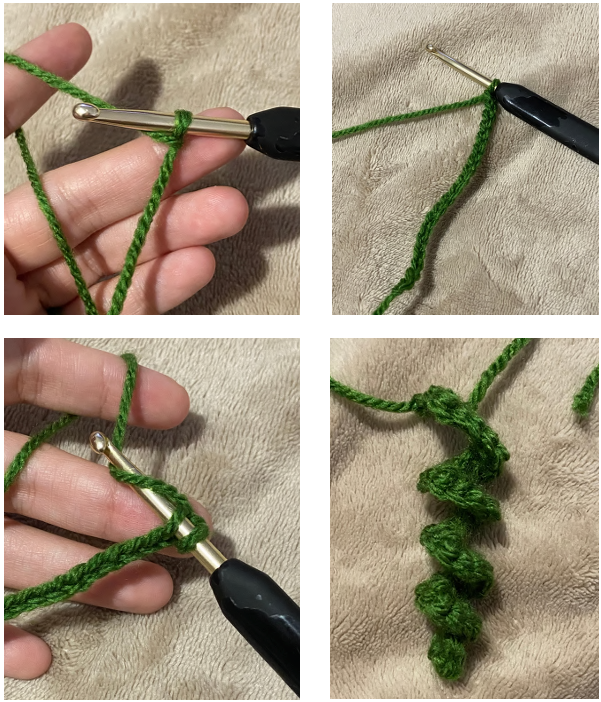
Leaf (Optional)
Start in green yarn.
Make a slip knot on the hook and ch19.
Round 1: Starting from 2nd ch from hook: (inc, 3 sc) x9.
After Round 1, make ch1, then FO.
Leave both tails for attaching to the pumpkin after.
Pumpkin
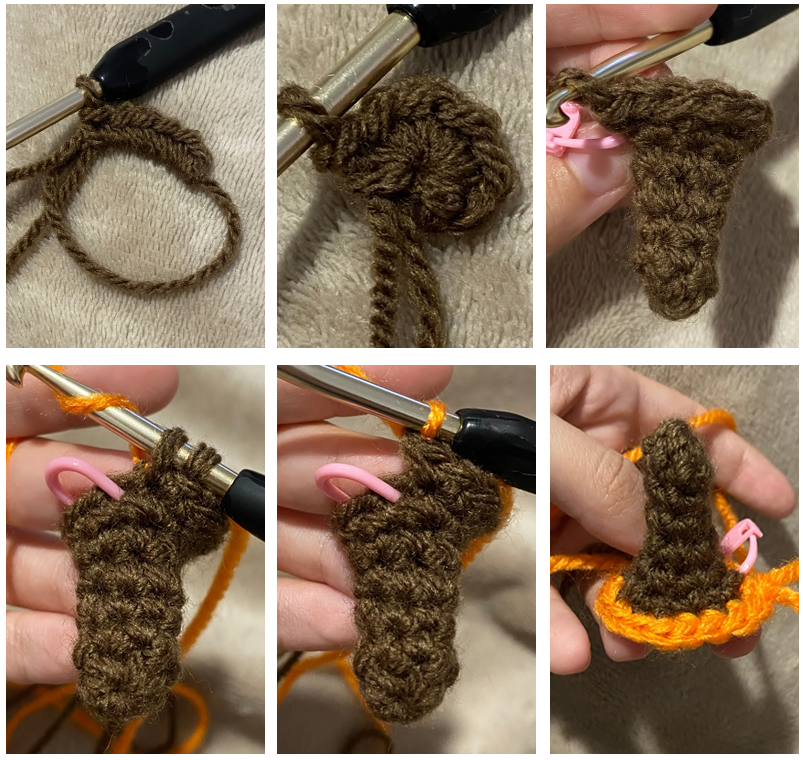
Start in brown yarn.
Round 1: 6 sc in a MR (6)
Rounds 2-5 (4 rounds): sc around (6)
Round 6: (sc, inc) x3 (9)
Round 7: (2 sc, inc) x3 (12)
Round 8: CC to orange in previous st, then (2 sc, inc) x4 (16).
Now, attach the green leaf: insert both green tails through this round with a hook
or needle, and tie a knot inside inside to secure.
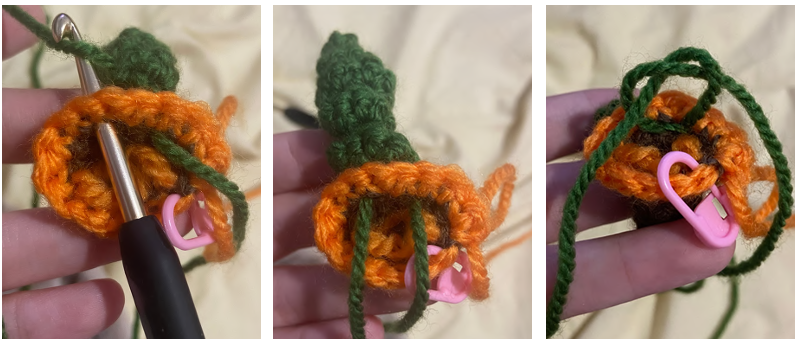
Round 9: continue with orange: (sc, inc) x8 (24)
Round 10: (2 sc, inc) x8 (32)
Round 11: (3 sc, inc) x8 (40)
Round 12: (4 sc, inc) x8 (48)
Rounds 13-21 (9 rounds): sc around (48)
Round 22: (4 sc, dec) x8 (40)
Round 23: (3 sc, dec) x8 (32)
Round 24: (2 sc, dec) x8 (24)
Round 25: (sc, dec) x8 (16)
Stuff firmly.
Round 26: dec around (8)
Leave a long tail (about 1 meter). Sew through the six remaining stitches and pull tight to close the pumpkin.
Next, insert the needle through the center of the top (right next to the brown stem) and bring it out through the center of the bottom. Pull the yarn firmly to shape the pumpkin. Repeat this process a total of six times, spacing the yarn evenly around the pumpkin to create its natural segments.
To finish, FO, hide the yarn end inside, and cut.
Finishing Touches and Styling Guide
Once you have pulled the center yarn to form the pumpkin’s grooves, attach the small brown stem firmly to the top center recess. You can also crochet a tiny curled vine or green leaf to attach alongside the stem for an extra touch of botanical charm.
Safety Note: If you are adding cute embroidered eyes or faces to turn your pumpkin into a “kawaii” plushie for young children, make sure all facial features are stitched down securely with yarn thread to eliminate any choking hazards.
And that’s it!
I hope you enjoyed crocheting this free pumpkin crochet pattern just as much as I loved designing it. If you decide to make one, I would love to see how it turns out—don’t forget to tag me on Instagram (@crochetbysilvia) so I can admire your cute amigurumi!
Your support means the world and helps me keep creating and sharing more free patterns with you!
Don’t doubt to check our other free crochet patterns.
—Happy crocheting!
This pattern is for personal use only. You may not copy, reproduce, alter, publish, or distribute this pattern in any format (including video tutorials). If you wish to share this pattern, please share a link to it rather than reprinting it on your site or blog.
You are welcome to sell finished items made from this pattern in small quantities, but do NOT use my photos as your listing or promotional photos. Please credit Crochet by Silvia as the designer.
Want to make more cute amigurumi friends? Check out my free spider crochet pattern or my free turtle crochet pattern!
Frequently Asked Questions About This Pattern
Yes! This pattern uses fundamental crochet stitches, including the magic ring, single crochet, increases, and decreases. It is a fantastic, stress-free project for beginners.
Most crocheters can complete a little plush pumpkin in about 30 to 45 minutes, making it a very fast and satisfying craft.
Absolutely! You are welcome to sell physical plushies created using this free pattern at craft fairs, autumn markets, or online shops. Do not use the original photos as your listing pictures.