If you love combining cute floral aesthetic designs with soft animal plushies, you are in for an absolute treat today. Today, I am sharing my Free Sunflower Turtle Crochet Pattern, a delightful amigurumi creation that turns a classic sea turtle shell into a blooming, golden sunflower!
Keep scrolling for the free pattern or purchase the ad-free printable PDF pattern on Etsy (50% off)
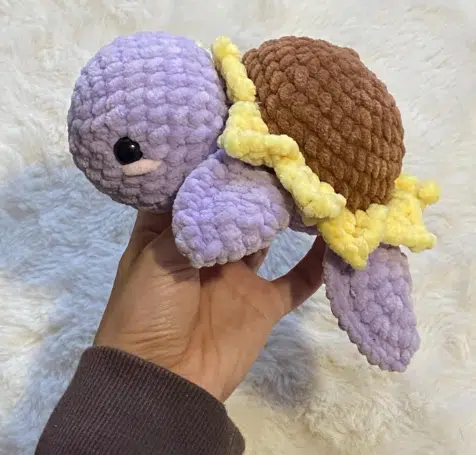
Whether you are crafting cozy gifts for loved ones, building stock for your next summer craft market bake, or simply indulging in a quick weekend project, this pattern works up surprisingly fast. Made with super bulky plush chenille yarn, this velvety sunflower turtle is squishy, adorable, and deeply satisfying to make.
I really love when sea turtle plushies transform into flowers! And I hope you also love it. Once you’ve made one, you’ll love to transform every sea turtle crochet plush to each type of flowers.
Why You Will Love This Sunflower Turtle Amigurumi Pattern
Unique Floral Design: Combining a textured brown seed-center shell with vibrant yellow petals gives traditional sea turtle amigurumi a fresh botanical twist.
Innovative Assembly: Instead of awkwardly sewing fins onto the outside of the plushie, this pattern features built-in chain gaps in the shell body where limbs slide right in for an ultra-clean, sturdy finish.
Plush & Squishy Texture: Using DMC velvet chenille yarn gives the turtle an irresistible, high-end toy finish that craft market shoppers adore.
Beginner-Friendly Techniques: If you know how to make a magic ring, single crochet, increases, decreases, and basic double/triple crochets, you can easily finish this project in under two hours!
Pattern Notes & Amigurumi Basics
Skill Level: Easy/Upper Beginner
Terminology: Standard US Crochet Terms
Work Style: Worked continuously in spiral rounds (do not join at the end of rounds unless explicitly instructed).
Finished Size: Approx. 6.5–7 inches (16–18 cm) long when using super bulky chenille yarn and a 4.5 mm hook.
Stitch Marker Tip: Always place a stitch marker in the first or last stitch of every round to keep track of your stitch count, especially when working with plush yarn.
Creative Color Palette Ideas for Every Season
While the classic golden-yellow petals with a warm brown center replicate a sunny field of sunflowers, one of the greatest joys of amigurumi is customizing your yarn palette! Because the shell design is so versatile, you can easily transform this turtle into different flowers or aesthetic themes simply by swapping yarn shades:
Spring Cherry Blossom Turtle: Use soft pastel pink for the petals, a white or cream center for the shell, and a sage green shade for the body and fins.
Cozy Autumn Dahlia: Combine deep burnt orange or burgundy for the petals, a dark chocolate brown center, and a mustard yellow or tan body.
Gothic Dark Sunflower: For a edgy, modern craft fair look, try vibrant yellow petals set against a jet-black center shell and a dark violet or charcoal body.
Ocean Breeze Lotus: Swap yellow for seafoam blue or soft mint, pair it with a white shell center, and use a pastel turquoise for the limbs.
When picking alternative colors, always aim for high contrast between the petal yarn and the top shell dome. This ensures the picot petal border pops visually, both in person and in product photography!
Materials & Tools Required
To recreate the exact plushie shown in the photos, gather the following supplies:
- Yarn: Super Bulky Chenille/Plush Yarn (e.g., DMC Chenille or Hobbii Honey Bunny / Toucan):
- Brown: For the sunflower center shell.
- Yellow: For the sunflower petals.
- Lavender / Light Purple: For the head, fins, and bottom body (or any pastel color of your choice).
- Pink: A tiny strand for embroidering optional cheek blush.
- Crochet Hook: 4.5 mm (or a size suitable to achieve tight stitches without gaps).
- Safety Eyes: 4 mm to 8 mm black plastic safety eyes.
- Stuffing: Premium synthetic polyester fiberfill stuffing.
- Notions: Blunt tapestry needle, scissors, and stitch markers.
Crochet Abbreviations (US Terms)
MR: Magic Ring (Magic Circle)
Ch: Chain
St: Stitch
Sc: Single Crochet
Inc: Increase (2 sc in the same stitch)
Dec: Decrease (sc 2 stitches together, preferably invisible decrease)
Dc: Double Crochet
Tr: Triple (Treble) Crochet
Slst: Slip Stitch
Sk: Skip stitch
BLO: Back Loops Only
FLO: Front Loops Only
CC: Change Color
FO: Fasten Off
Not ready to start right now?
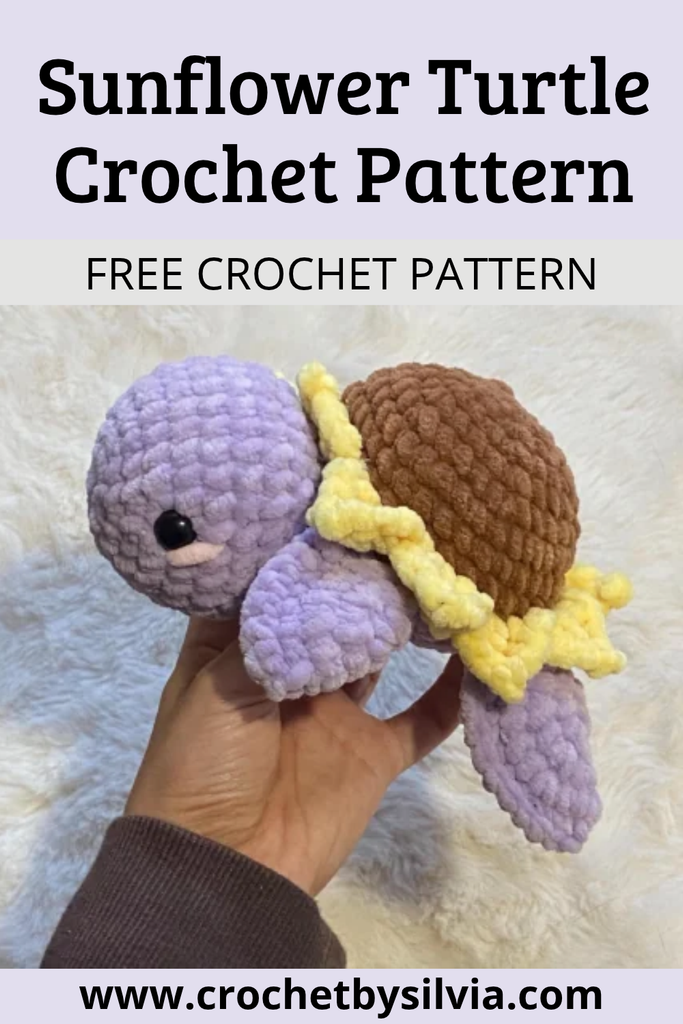
Subscribe for a free PDF pattern!
Get the Ad-Free Printable PDF Pattern!
Prefer to download or print this pattern? You can now download the ad-free, printable PDF version of this pattern directly on Etsy! Instant download are available on Etsy right after purchase.
Want a printable PDF ad-free version? Get it here!Free Sunflower Sea Turtle Crochet Pattern
Crocheting the Head
Start with purple yarn
Round 1: MR of 6 st [6]
Round 2: x6 inc [12] (you do one increase per each stitch).
Round 3: (1 sc, 1 inc)x6 [18] (you do one increase in the first stitch, then one single crochet in the following stitch, repeat this 6 times until the end of the row).
Round 4: (2 sc, 1 inc)x6 [24]
Round 5: (3 sc, 1 inc)x6 [30]
Rounds 6-9 (4 rounds): 30 sc [30]
Round 10: (3 sc, 1 dec)x6 [24]
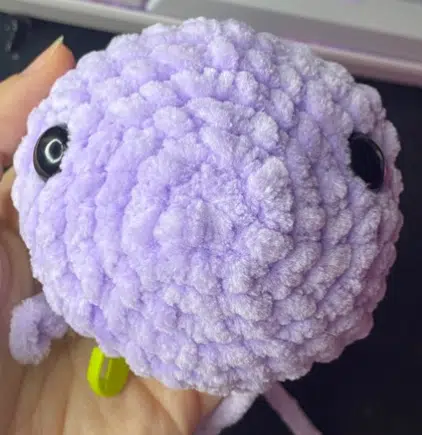
Place eyes of security between R5 and R6, 10 stitches apart.
Round 11: (2 sc, 1 dec)x6 [18]
Stuff the head firmly with polyester fiberfill stuffing.
Round 12: (1 sc, 1 dec)x6 [12]
Sl st into the next stitch, fasten off (FO), and leave a very long tail for sewing the head to the shell body later.
Crocheting the fins (Make 4)
We will crochet 4 circular fins in purple yarn, fold them in half, and seal them.
Round 1: MR 8 st [8]
Round 2: x8 inc [16]
Round 3: (1 sc, 1 inc)x8 [24]
Round 4: (2 sc, 1 inc)x8 [32]
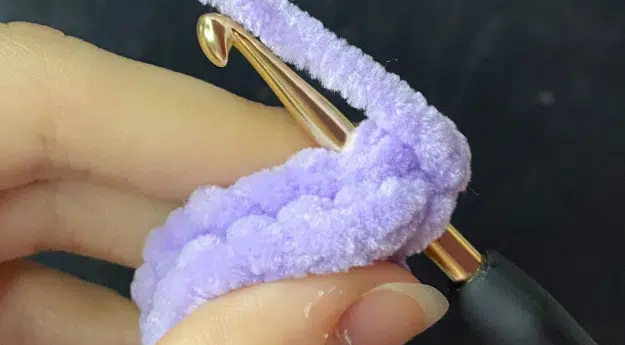
Fold the circle in half and work single crochet stitches across the flat border to join both sides together.
CRITICAL FIN SYMMETRY STEP:
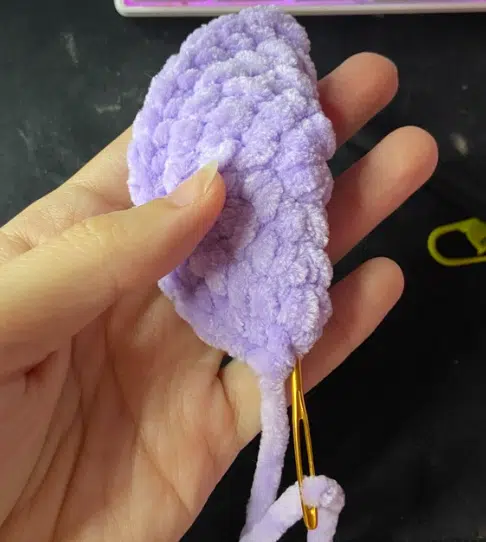
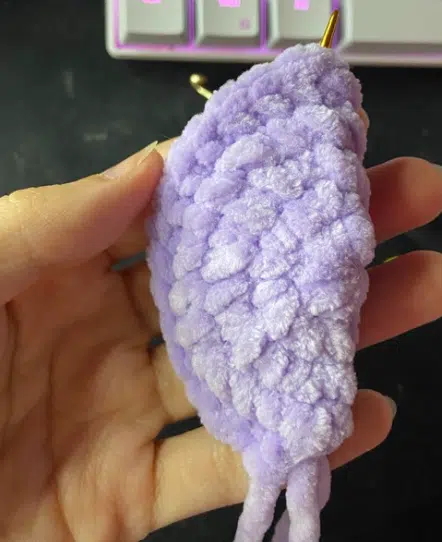
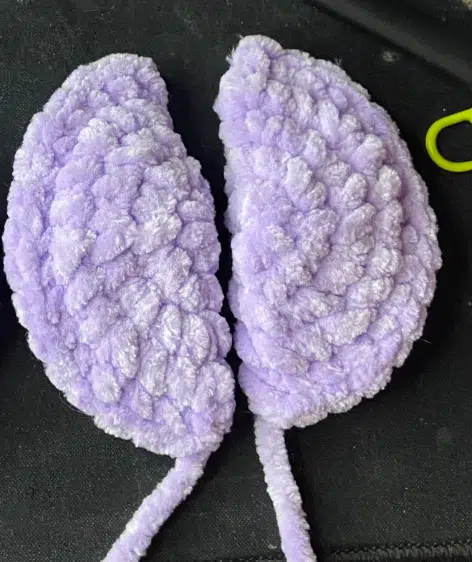
Once all 4 fins are completed, use a yarn needle to thread the starting tail on 2 of the fins to the opposite side. This creates two distinct symmetrical pairs (two left fins and two right fins). Do not skip this step—it ensures the neat edge of the fin stitches faces upward on both sides of the turtle!
Crocheting the Tail
A quick, cute little tail to complete the body outline.
Start with purple yarn (or main color yarn)
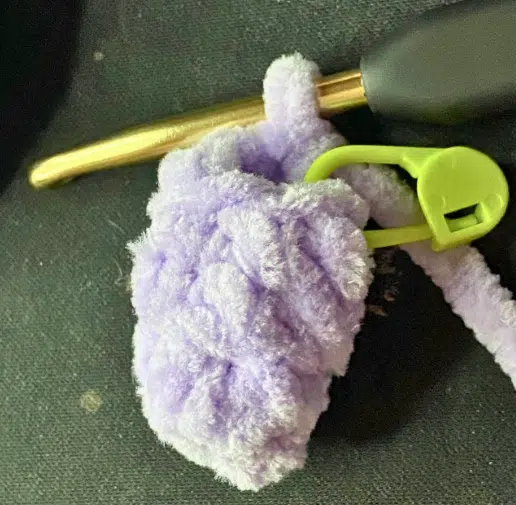
Round 1: MR of 6 sc [6]
Rounds 2-4 (3 rounds): 6 sc [6] (Working 6 sc in chenille yarn can be tight, but work slowly)
Sl st into the next stitch, pull the yarn through, and leave a tail for sewing.
Crocheting the Shell
The shell starts in brown yarn to represent the center seed head of a sunflower.
Start in brown yarn
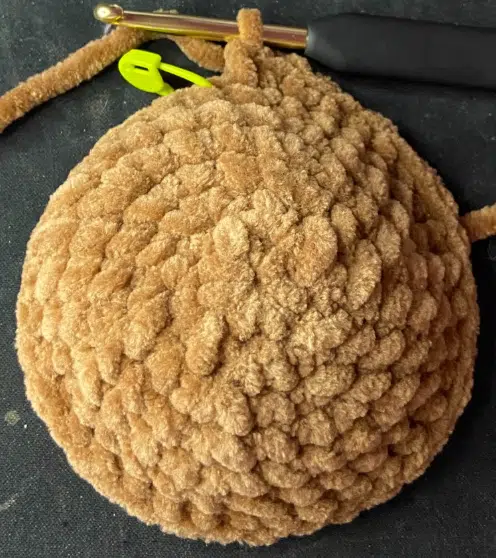
Round 1: MR of 6 st [6]
Round 2: x6 inc [12]
Round 3: (1 sc, 1 inc)x6 [18]
Round 4: (2 sc, 1 inc)x6 [24]
Round 5: (3 sc, 1 inc)x6 [30]
Round 6: (4 sc, 1 inc)x6 [36]
Rounds 7-9 (three rows): x36 sc [36]
Sl st in the next stitch. Thread the brown yarn end through to the inside of the shell with a tapestry needle and tie a tight knot with the initial magic ring tail to form a clean, domed shell shape.
Lower Body Transition (Color Change to Purple)
Attach purple yarn into the Back Loops Only (BLO) of Round 9, tying a knot on the interior.
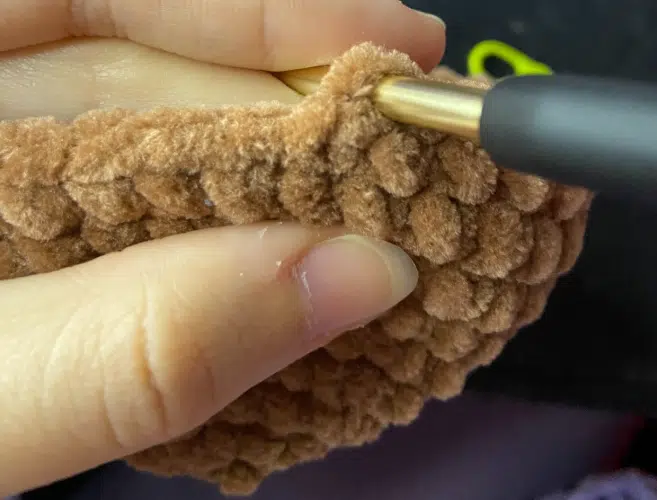
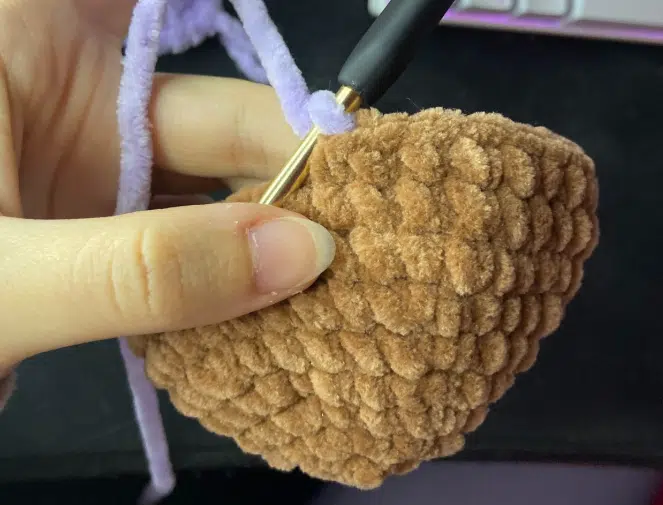
Round 10: 36 sc BLO [36]
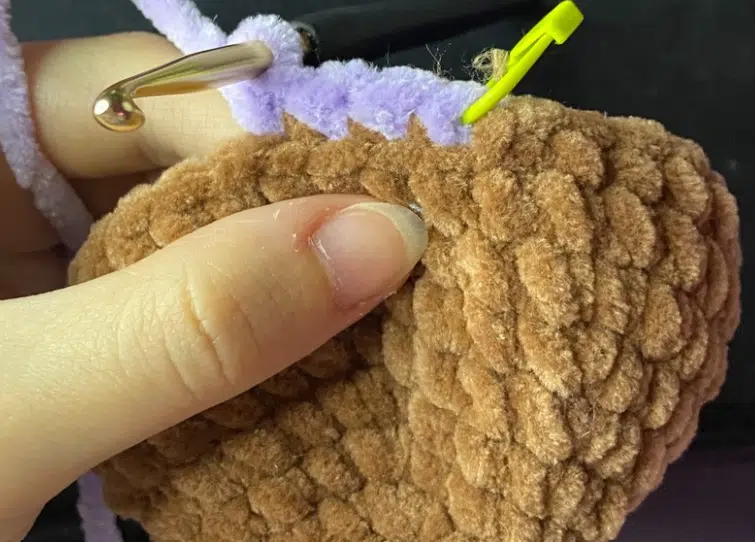
Round 11: 6 sc, chain 3, skip 3, 4 sc, ch 3, sk 3, 2 sc, ch 2, sk 2, 2 sc, ch 3, sk 3, 4 sc, ch 3, sk 3, 3 sc [36]
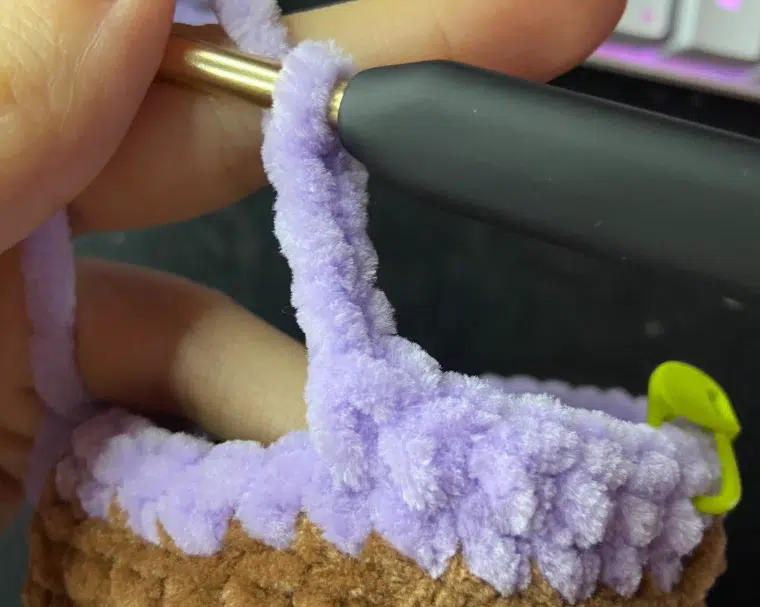
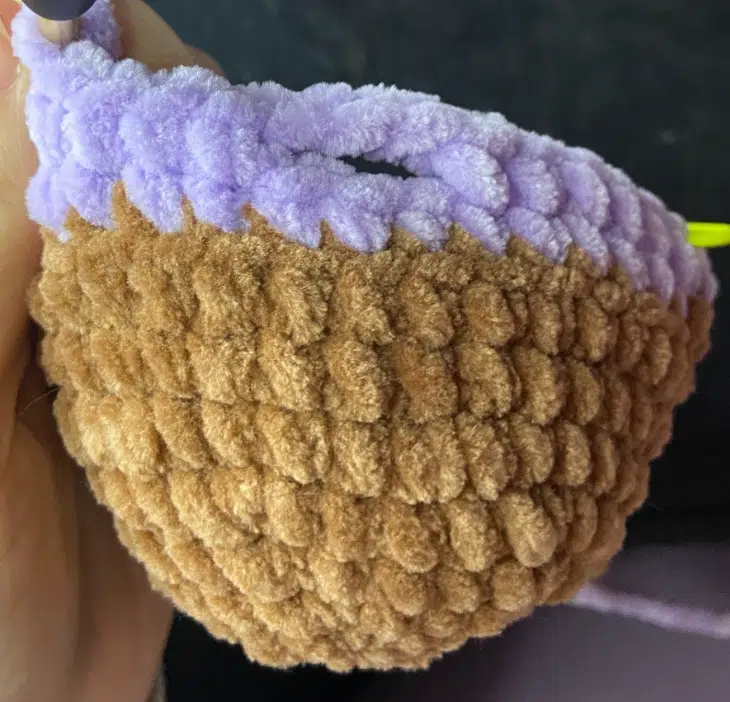
Round 12: (4 sc, 1 dec)x6 [30] (When working across the chain spaces, sc into the loops of the chains!)
Round 13: (3 sc, 1 dec)x6 [24]
Securing Limbs & Closing the Body
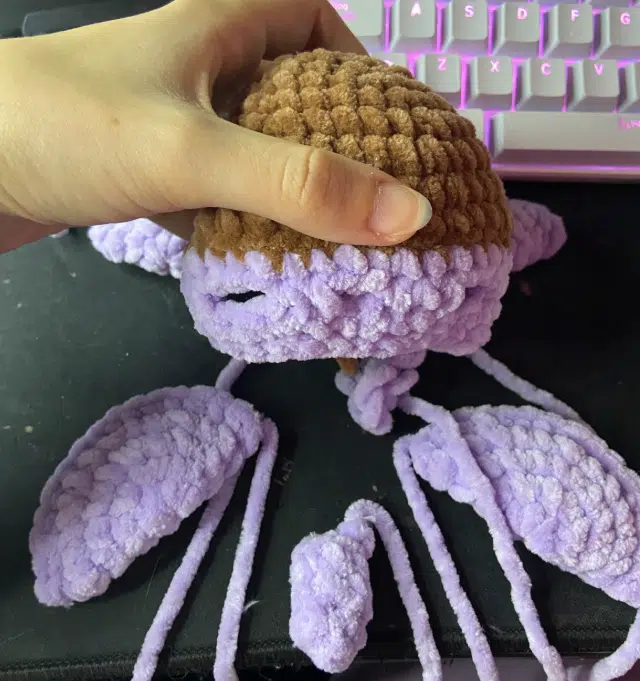
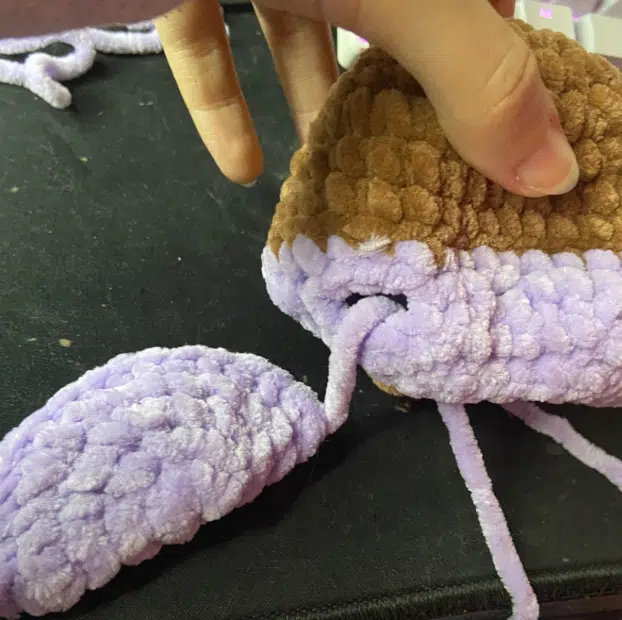
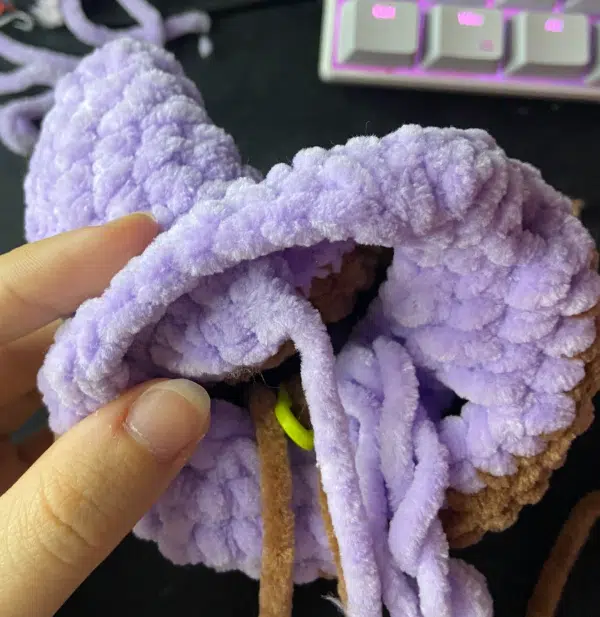
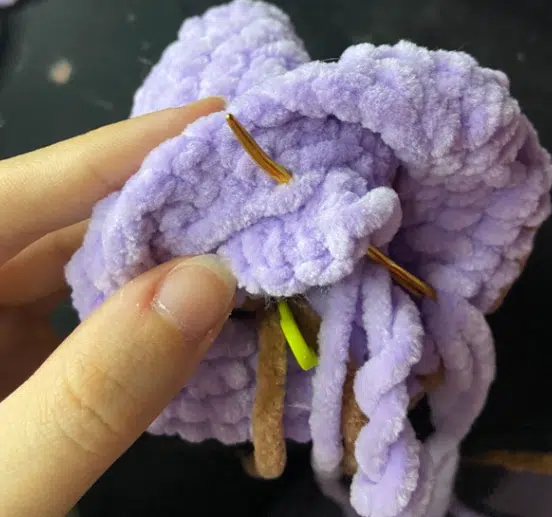
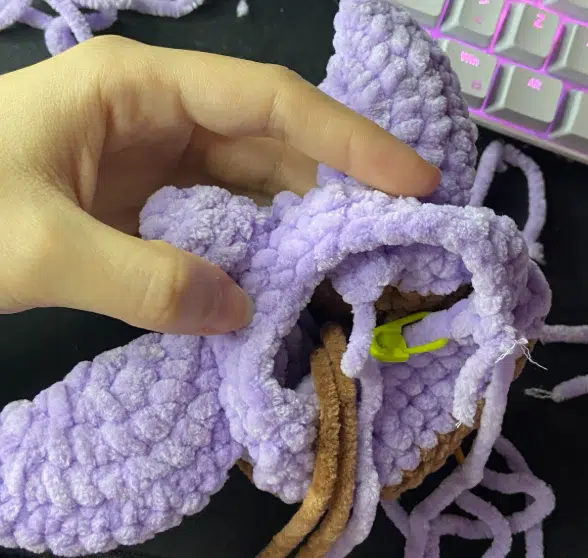
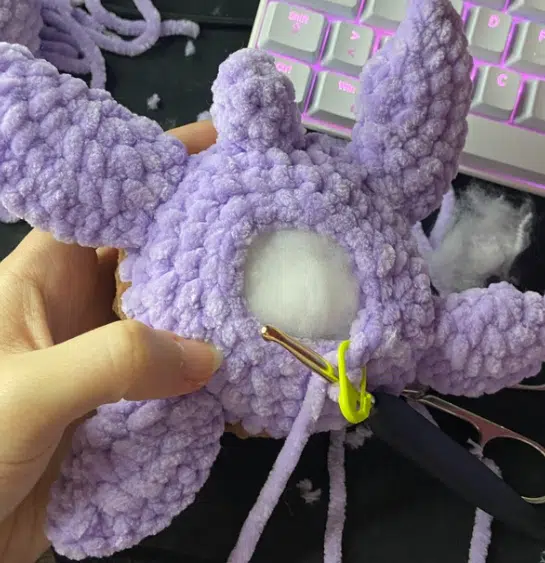
Before completing the final decrease rounds, pause at the end of Round 13 to attach the fins and tail.
- Tail Placement: Insert the tail yarn end into the smallest 2-stitch hole at the back of the shell.
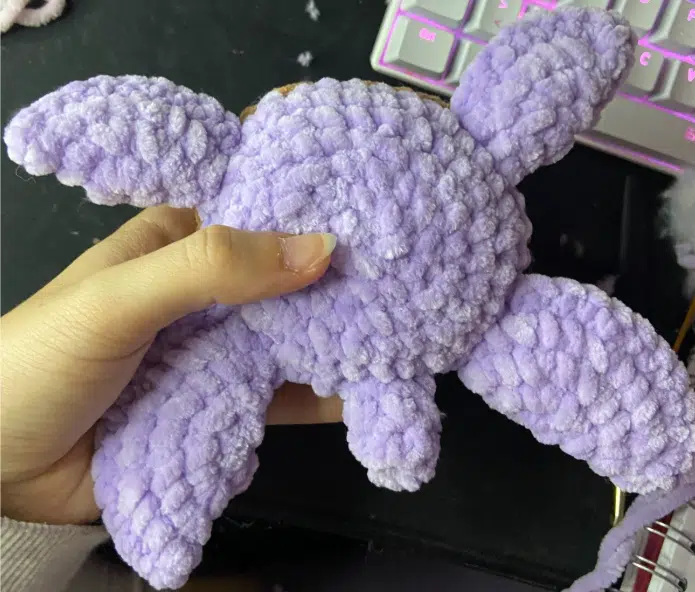
- Rear Fins: Insert one rear fin into the 3-stitch chain gap directly to the left of the tail, and the second rear fin into the gap to the right.
- Front Fins: Insert the remaining two fins into the front 3-stitch chain gaps.
- Securing: Pull the yarn tails inside the body shell, stitch them securely around the internal posts, and tie firm knots inside. Ensure the top border stitch edge of the fins faces upward for the prettiest look!
Now complete the bottom body closure:
Round 14: (2 sc, 1 dec)x6 [18]
Fill the body shell firmly with polyester stuffing.
Round 15: (1 sc, 1 dec)x6 [12]
Round 16: x6 dec [6]
Stitch the remaining 6 stitches in Front Loops Only (FLO), pull the yarn tail tightly to close the hole completely, weave the tail inside the plushie, and snip.
Crocheting Yellow Sunflower Petals
Now we turn the top brown ridge into a blooming sunflower!
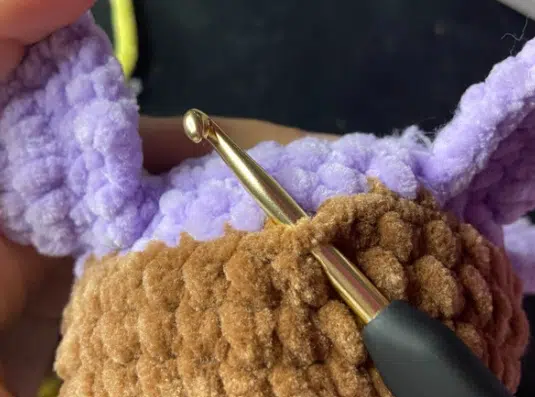
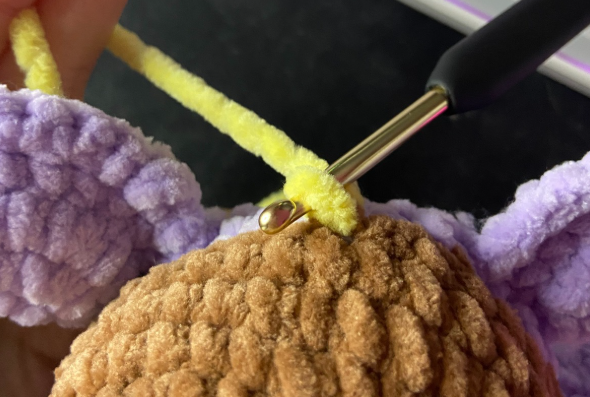
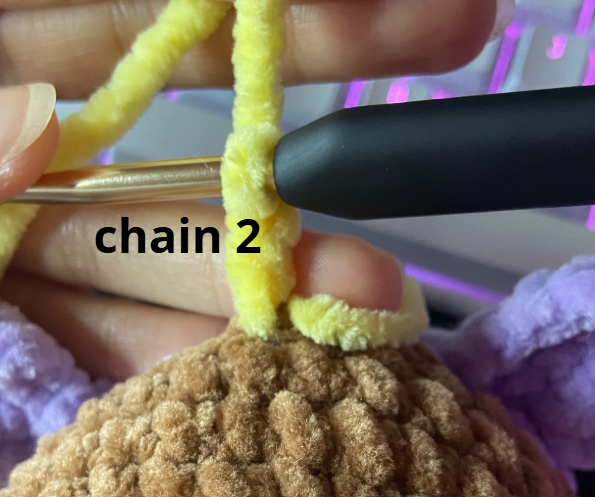
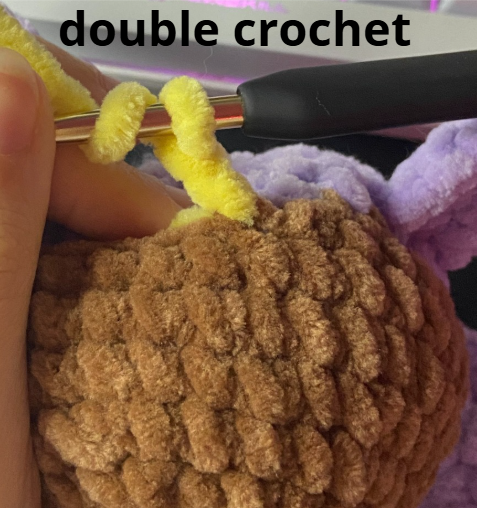
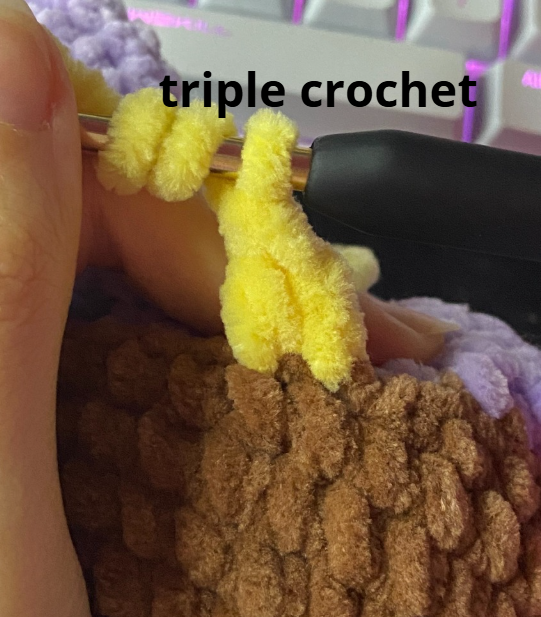
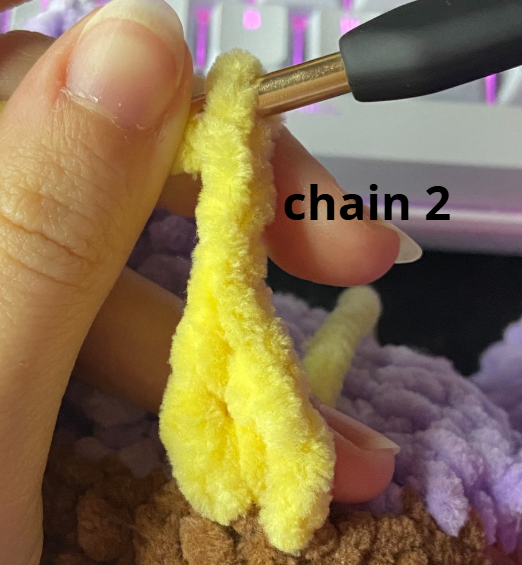
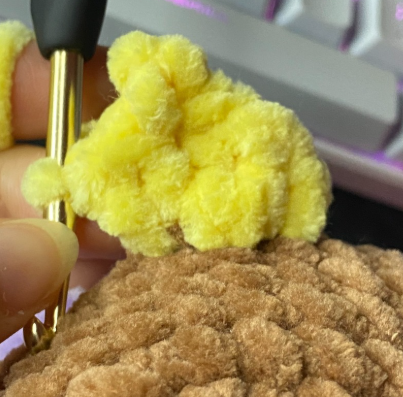
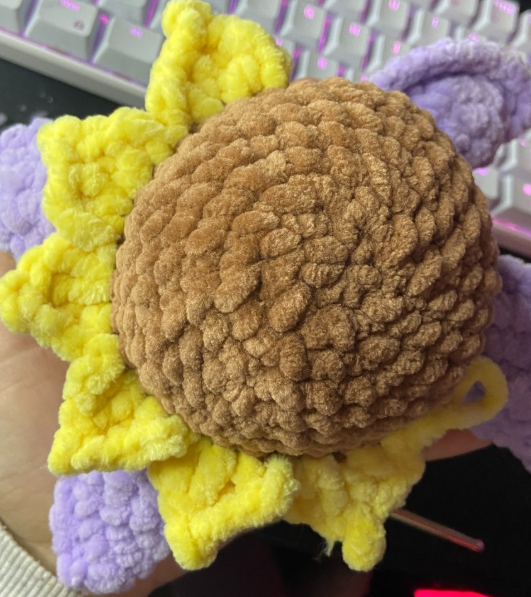
Attach yellow yarn into the exposed Front Loops (FLO) of Round 9 (the boundary line between the brown shell and purple body).
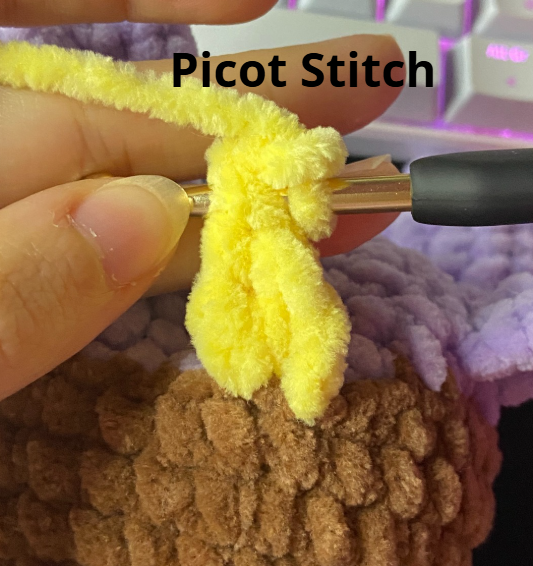
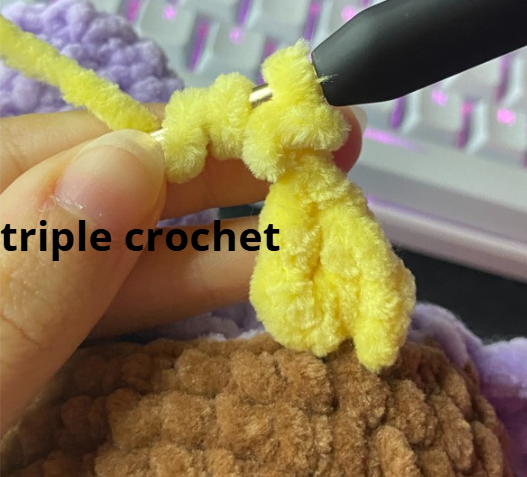
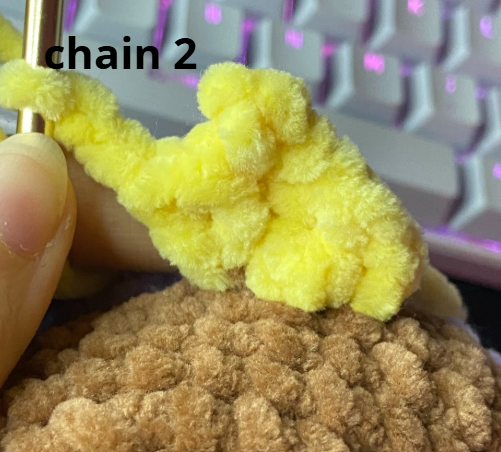
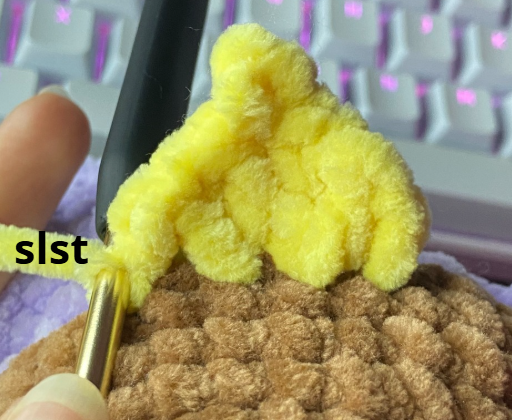
Work 12 petal clusters around the entire circumference using this exact petal sequence: ch 2, 1 dc in the next st, 1 tr in the same stitch, ch 2, picot stitch between the two loops that are under the chain you’ve made (picot is like a sl st with those two loops), 1 tr in the next stitch, 1 dc in the same stitch, ch 2, and sl st in the next stitch. Repeat this sequence 12 times all the way around. Fasten off, weave the yellow yarn tail internally, and secure with a knot.
Final Assembly and Facial Details
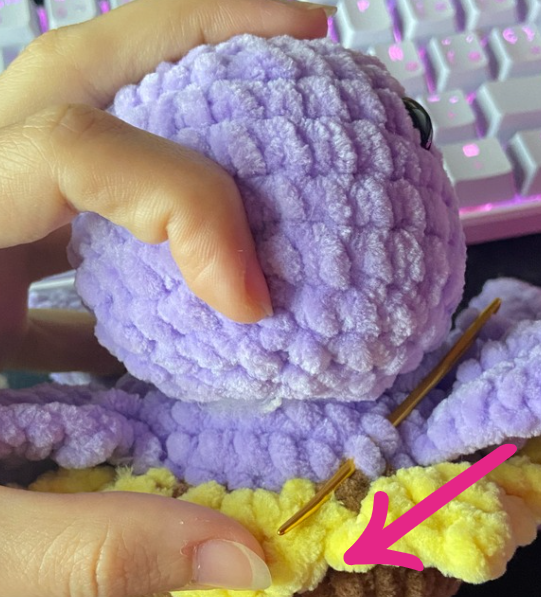
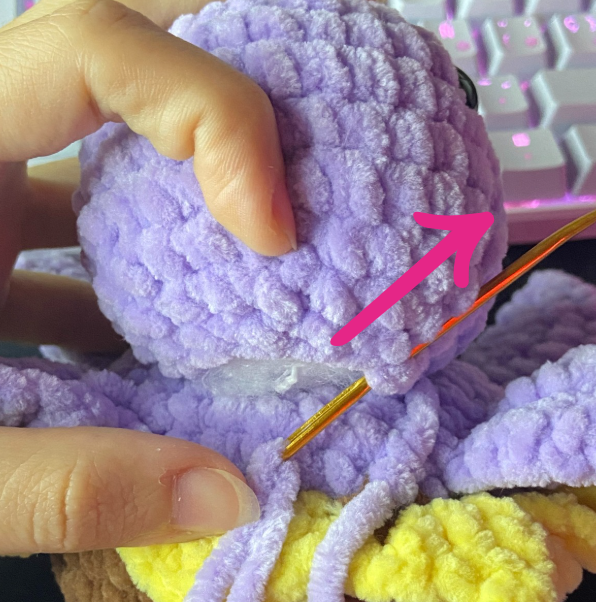
Attaching the Head: Position the head against the front of the body shell between the two front fins. Using the long purple tail left on the head, pass your needle horizontally through the body stitches and vertically through the head stitches until sewn tightly all around. Knot securely and hide the thread inside.
Optional Blush Detail: Thread a small piece of pink yarn under each safety eye to embroider a cute pink cheek blush. Tie off both ends, pull the knots inside the head, and trim.
Congratulations! Your plush Sunflower Turtle Amigurumi is complete!
5 Expert Tips for Perfect Chenille Plushie Amigurumi
Prevent Snapping Chenille Yarn: When pulling magic rings tight with plush chenille yarn, pull slowly and gently at a low angle. Alternatively, chain 2 and work Round 1 directly into the 1st chain.
Maintain Firm Tension: Use a hook size smaller than listed on the yarn label (e.g., 4.5 mm hook for super bulky yarn) to prevent fiberfill stuffing from poking through your stitches.
Seamless Color Changes: Change yarn colors on the final yarn-over of the previous stitch to create clean color junctions between the shell and body.
Symmetrical Fin Orientation: Pay close attention to flipping the tail thread on two of your fins! Symmetrical fins lie flat and look uniform on both sides.
Frequently Asked Questions (FAQ)
Can I make this pattern with standard worsted weight acrylic yarn?
Yes! You can use medium worsted weight (Category 4) acrylic or cotton yarn with a 3.0 mm or 3.5 mm crochet hook. The resulting turtle will be a miniature version (around 3 to 4 inches long), ideal for keychains or desk buddies!
Is this crochet pattern beginner-friendly?
Absolutely! As long as you understand basic stitches (single crochet, double crochet, triple crochet, increases, and decreases), the clear step-by-step instructions and built-in limb chain gaps make assembly straightforward.
How do I wash plush chenille amigurumi?
Spot cleaning with a damp cloth and mild detergent is recommended. If machine washing is necessary, place the plushie in a delicate mesh laundry bag, wash on cold gentle cycle, and lay flat to air dry.
Show Off Your Sunflower Turtles!
I would love to see your finished creations! Tag @crochetbysilvia on Instagram and share photos of your completed plushies.
If you loved this free pattern, consider sharing this blog post link on Pinterest or in your favorite Facebook crochet groups.
—Happy crocheting!